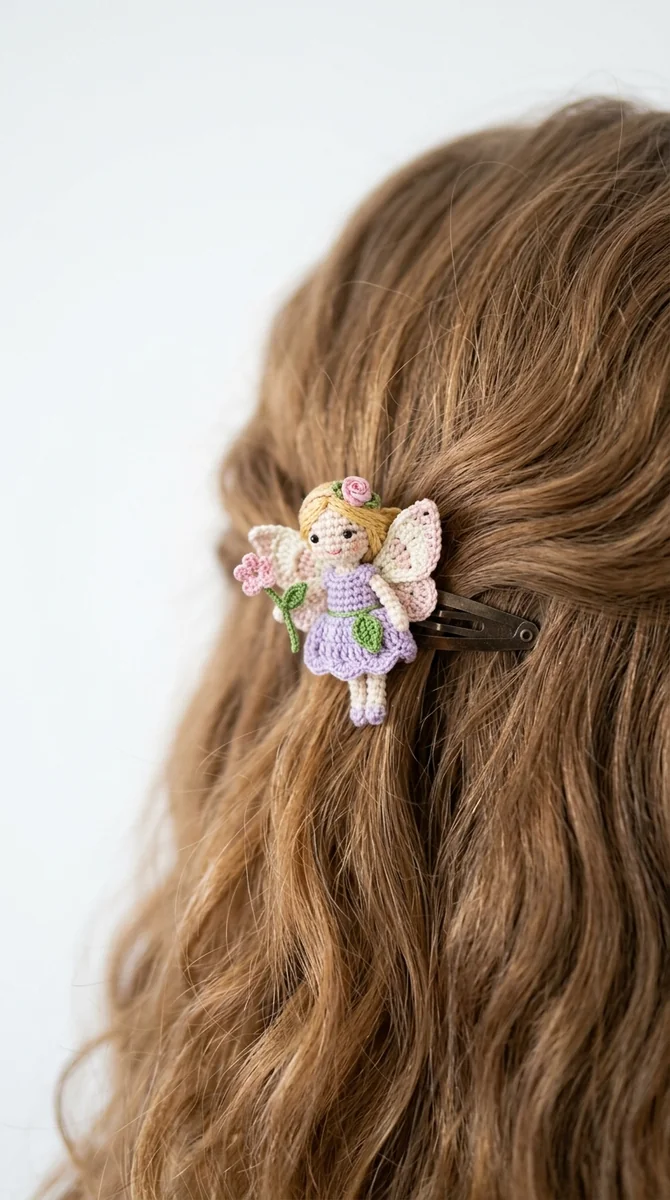
Flower fairy hair clip crochet is a small accessory project built from separate, easy-to-see parts: a tiny doll, two wings, a flower accent and a soft crochet pad for a snap clip. The goal of this guide is to give you a clear assembly order so the finished piece stays light enough for hair and the metal clip can still open.
Image note: the cover is an illustrative AI concept image for this design. Use the written instructions and assembly map as the guide; yarn weight, tension and the clip style can change the final size.
Project at a glance
- Skill level: confident beginner to intermediate
- Target size: a 6–7 cm / 2.4–2.8 in fairy, plus the clip
- Construction: head, body/dress, limbs, wings, flower and clip pad
- Terminology: US crochet terms. UK equivalents: sc = dc, hdc = htr, dc = tr.
Materials
- Fingering or light sport-weight cotton yarn: skin tone, hair color, dress color, green and one flower color
- 1.75–2.25 mm crochet hook; choose a size that gives a firm fabric
- One 5 cm / 2 in snap clip or alligator clip
- Small amount of polyester stuffing
- Black embroidery thread for the face
- Tapestry needle, scissors and stitch marker
- Optional: tiny bead, sewing thread or fabric glue for the flower center
Gauge and sizing note
This project is intentionally small, so a loose fabric will make the head and body look uneven. Crochet a small circle of 12 single crochet stitches before starting. If light shows through the circle or stuffing would escape, switch to a smaller hook. The stitch counts below create a compact doll; changing yarn weight changes the scale, so measure the clip pad against your own metal clip before assembly.
Abbreviations
- MR — magic ring
- ch — chain
- sc — single crochet
- hdc — half double crochet
- dc — double crochet
- inc — work 2 sc in the same stitch
- dec — invisible decrease
- sl st — slip stitch
1. Make the head
With skin-tone yarn, work in continuous rounds. Mark the first stitch of every round.
- Round 1: 6 sc in MR. (6)
- Round 2: inc in every stitch. (12)
- Round 3: [sc, inc] repeat 6 times. (18)
- Rounds 4–6: sc in every stitch. (18)
- Round 7: [sc, dec] repeat 6 times. (12)
Embroider two small closed eyes between Rounds 4 and 5, leaving about three stitches between them. Add a small amount of stuffing before closing. Round 8: dec 6 times. (6) Fasten off, pull the yarn tail through the front loops and close the opening. Leave a long tail for sewing the head to the body.
2. Make the hair cap and flower
For the hair cap, start with a MR in hair-color yarn. Work 6 sc in the ring, then inc in every stitch for 12 stitches. Work one round of sc. Place the cap over the top half of the head and sew it around the edge with small, even stitches. Add three short yarn strands at the front for a fringe, or add a small chain braid down one side.
For a simple flower, use the accent color: 5 sc in MR, join with a sl st, then repeat [ch 2, 2 dc, ch 2, sl st] in each stitch. This makes five rounded petals. Sew the flower to one side of the hair cap. A French knot, bead or tiny circle of contrasting yarn can become the center.
3. Make the body and dress
With dress-color yarn, make the body as a shallow cone. Round 1: 6 sc in MR. Round 2: inc in every stitch. (12) Rounds 3–4: sc in every stitch. (12) For the skirt edge, work [sc, 2 dc in next stitch] around. This creates a soft ruffle without adding a heavy layer to the clip.
For a separate green belt, ch 14, check the chain against the body, then fasten off. Wrap it around the narrowest part of the body and sew the ends together at the back. Lightly stuff the body only if it needs shape; overstuffing makes the clip pull away from the hair.
4. Make arms and legs
Make two arms and two legs with skin-tone yarn. For each arm, ch 7. Starting in the second chain from the hook, sc in the next 5 chains and sl st in the last chain. Fasten off with a sewing tail. For each leg, ch 9. Starting in the second chain, sc in the next 7 chains and sl st in the last chain. The longer leg chain helps the finished fairy look balanced below the dress.
Sew arms just under the head, angled slightly forward. Sew legs under the body before attaching the doll to the clip pad. Check that both legs hang at the same length before securing the second one.
5. Make two wings
With pale green, pink or cream yarn, make two matching teardrop wings. Ch 8. Starting in the second chain from the hook: sl st, sc, hdc, dc, dc, hdc; place 3 sc in the final chain. Work down the other side: hdc, dc, dc, hdc, sc, sl st. Fasten off with a tail. Repeat for the second wing.
Lay the wings behind the top of the body, with their rounded ends pointing outward. Sew through the center of both wings several times. Do not attach only at the edge: a centered anchor keeps them from twisting when the clip is opened.
6. Crochet the clip pad
With green yarn, ch 18. Measure the chain against the top of the closed clip; it should be a little shorter than the metal. Starting in the second chain, sc across. Ch 1, turn, and work a second row of sc. Fasten off, leaving a long tail.
Place the pad on top of the closed clip. Stitch around the metal spine rather than sealing the moving end of the clip. Test the mechanism after every few stitches. The clip must open freely before the fairy is sewn on.
Illustrative assembly map
| Order | Part | Check before moving on |
|---|---|---|
| 1 | Clip pad | The snap clip still opens and closes. |
| 2 | Wings | Both wings sit at the same height on the pad. |
| 3 | Legs and body | The body is centered and not overstuffed. |
| 4 | Head and arms | The face is upright when the clip is worn. |
| 5 | Hair and flower | Small details are secured away from the clip hinge. |
Illustrative assembly guide: use this order to avoid sewing a finished doll onto a clip that no longer functions.
Finishing and troubleshooting
- The clip will not close: remove any stitches or glue near the moving end. The pad should attach only along the fixed spine.
- The fairy tilts forward: move the wings and head closer to the center of the pad, or reduce stuffing in the body.
- The head looks too large: use a smaller hook or stop after Round 5 before beginning decreases.
- Wings curl: press them under a damp cloth, then allow them to dry flat before assembly.
Color variations and care
Use one palette at a time to keep a small accessory readable: lavender dress with cream wings, moss green dress with peach wings, or soft pink with pale yellow details. Avoid heavy beads if the clip is for fine hair. Spot clean the yarn with a damp cloth and keep the metal clip dry to help prevent rust.
This pattern is an original illustrative design guide. Check fit, tension and attachment strength on your own materials before making it for a child or for sale.