Blushing Tulip Crochet Ring: Free Pattern & Step-by-Step Tutorial
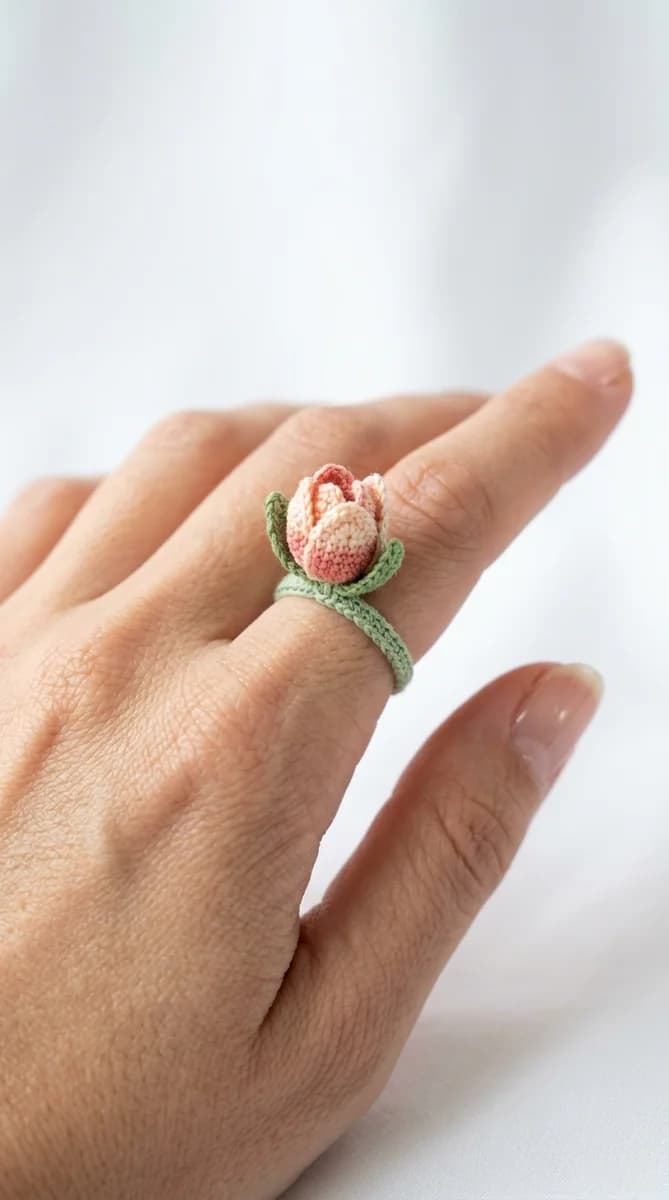
Introduction to the Blushing Tulip Crochet Ring
Note: This pattern uses US crochet terminology. UK/Commonwealth terms: sc = dc, hdc = htr, dc = tr, tr = dtr.
This lovely tulip crochet ring is the perfect handmade accessory to add a touch of spring to your style. Designed to resemble a tiny tulip bud in full bloom, this jewelry piece is lightweight, comfortable, and absolutely gorgeous. Whether you are looking for a quick stash-busting project or a unique gift for a friend, this tulip crochet ring is a wonderful project that you can complete in under thirty minutes.
Crochet rings have become incredibly popular due to their versatility and boho-chic aesthetic. In this comprehensive guide, we will walk you through all the steps required to create your own blushing tulip ring. We will cover the materials needed, the abbreviations used, a detailed round-by-round pattern, and assembly tips to make sure your finished ring looks professional and fits comfortably on your finger.
Materials and Tools Needed
To create a high-quality tulip crochet ring, you will need the following materials. Since this is a miniature project, you can easily use leftovers from other projects:
- Yarn: Crochet thread size 10 or embroidery floss is recommended. You will need pink or red for the tulip bud, green for the leaves, and a neutral beige or brown for the ring band.
- Hook Size: A steel crochet hook in size 1.5 mm or 1.75 mm is ideal for producing tight, neat stitches.
- Tapestry Needle: A small tapestry needle with a large eye to weave in ends and sew the parts together.
- Scissors: For cutting the thread.
- Fabric Glue: Optional, but useful for securing the knots and ends at the back of the band.
- Measuring Tape: To check the size of your finger band.
Stitch Abbreviations (US Terms)
Before starting, familiarize yourself with these common crochet abbreviations used in the pattern:
- MR: Magic Ring
- ch: Chain stitch
- sc: Single crochet
- hdc: Half double crochet
- dc: Double crochet
- sl st: Slip stitch
- inc: Increase (two single crochets in the same stitch)
- dec: Decrease (invisible single crochet decrease)
- st(s): Stitch(es)
Step-by-Step Pattern Instructions
Part 1: The Ring Band
The ring band needs to fit snugly around your finger. We will work in rows to make a simple flat band that we can sew together at the end.
Row 1: Using the beige or neutral thread, leave a long tail of about 6 inches. Chain 18 (or the number of chains needed to fit around your finger). Turn. (18 sts)
Row 2: Starting in the second chain from the hook, work 1 sc in each chain across. Chain 1, turn. (17 sts)
Row 3: Work 1 sc in each stitch across. Fasten off, leaving a long tail for sewing the band ends together. Adjust the number of rows if you prefer a wider ring band.
Part 2: The Tulip Bud
The tulip bud is worked in continuous rounds. You can use a stitch marker to track the beginning of each round.
Round 1: Using pink or red thread, work 6 sc into a Magic Ring. Pull ring closed. (6 sts)
Round 2: Work 2 sc in each stitch around (inc x 6). (12 sts)
Round 3-6: Work 1 sc in each stitch around. (12 sts for four rounds)
Round 7: Work (sc 1, dec) four times. (8 sts)
Fasten off, leaving a tail of about 8 inches for shaping the petals. To form the tulip petals, stuff the tiny bud lightly with a small pinch of stuffing. Insert your needle into the front loop of the remaining stitches and pull to close the bottom. Then, insert the needle through the center of the bud to the top opening. Pinch the top edges together and sew across. Then, pinch the other two sides together to create a cross shape (+) and sew through the center. This creates a realistic four-petal closed tulip bud.
Part 3: The Green Leaves
The leaves add a beautiful contrast to the blushing pink tulip.
Row 1: Using green thread, chain 8. Start in the second chain from the hook and work: 1 sl st, 1 sc, 2 hdc, 1 sc, 1 sl st. Leave the remaining chains unworked to create a small stem. Fasten off and leave a tail for assembly.
Assembly and Finishing Details
Now that all the individual pieces are ready, it is time to assemble your tulip crochet ring:
- First, sew the green leaf stem to the bottom of the tulip bud using the green yarn tail. Ensure it is secured tightly.
- Next, wrap the ring band around your finger to double-check the fit. Thread your tapestry needle with the beige yarn tail and sew the two ends of the band together to form a ring. Secure with a double knot.
- Position the tulip bud and leaves directly over the sewn seam of the ring band. This will hide the seam perfectly. Sew the base of the tulip securely onto the band.
- Weave in all remaining yarn tails through the stitches on the inside of the ring. Cut the threads close to the fabric. If desired, apply a tiny drop of fabric glue to secure the ends from fraying.
Pro Tips for Customizing Your Ring
To make your ring even more unique, consider these ideas:
- Gradient Thread: Use variegated thread to give the tulip natural color transitions.
- Bead Details: Sew a tiny yellow pearl or bead inside the center of the tulip before closing the petals.
- Stacking Rings: Make multiple rings in different colors like lavender, yellow, and white to wear them together.
- Stretching: Keep in mind that crochet fabric stretches slightly over time, so make the band a tiny bit smaller than your actual finger size.