Crochet Pumpkin King Amigurumi: Free Pattern & Step-by-Step Tutorial
Why You’ll Love This Spooky Pumpkin King Crochet Pattern
Note: This pattern uses US crochet terminology. UK/Commonwealth terms: sc = dc, hdc = htr, dc = tr, tr = dtr.
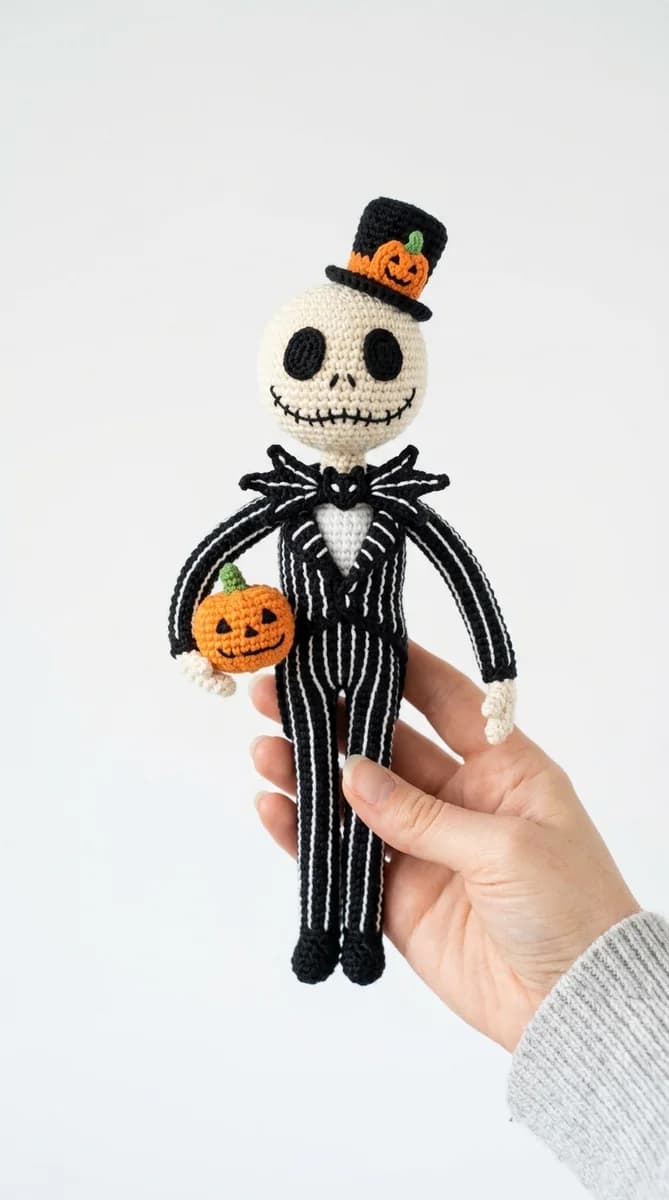
Creating this detailed pumpkin-king-crochet-amigurumi-pattern is the ultimate project for the spooky season. With his regal suit, expressive features, and distinctive orange pumpkin head, this design blends Halloween charm with whimsical fantasy. Whether you want to decorate your shelf or gift a piece of handmade spooky magic to a loved one, this project delivers beautiful results.
This pattern is suitable for intermediate crocheters. It combines basic amigurumi shapes with detailed surface embroidery and structuring. By the end of this guide, you will have a sturdy, striking character that stands out in any collection of handmade toys.
Materials and Tools You Will Need
- Yarn: Medium weight (worsted) cotton or acrylic yarn. Colors: Bright Orange (for the pumpkin head), Black (for the suit jacket and trousers), White (for the pinstripes and shirt details), Green (for the stem/leaves), and Purple (optional for a royal cape).
- Crochet Hook: 2.5 mm or 3.0 mm to ensure tight stitches so the fiberfill doesn’t show through.
- Safety Eyes: 8 mm black plastic safety eyes (or you can embroider the eyes with black yarn for a more gothic look).
- Fiberfill Stuffing: High-quality polyester stuffing.
- Tapestry Needle: For sewing pieces together and embroidering details.
- Stitch Markers: Essential for keeping track of rounds.
- Scissors: For cutting yarn tails.
Abbreviations (US Terms)
- MR – Magic Ring
- ch – Chain
- sc – Single Crochet
- hdc – Half Double Crochet
- dc – Double Crochet
- inc – Increase (2 sc in the same stitch)
- dec – Decrease (invisible decrease recommended)
- sl st – Slip Stitch
- BLO – Back Loop Only
- FLO – Front Loop Only
Step-by-Step Crochet Instructions
1. The Pumpkin Head
Using Bright Orange yarn and your preferred hook size. We will build a ribbed sphere to simulate the pumpkin shape.
- Round 1: 6 sc in a Magic Ring (6)
- Round 2: inc in each st around (12)
- Round 3: [sc, inc] x 6 (18)
- Round 4: [sc 2, inc] x 6 (24)
- Round 5: [sc 3, inc] x 6 (30)
- Round 6: [sc 4, inc] x 6 (36)
- Round 7: [sc 5, inc] x 6 (42)
- Round 8–15: sc in each st around (42)
- Round 16: [sc 5, dec] x 6 (36)
- Round 17: [sc 4, dec] x 6 (30)
- Round 18: [sc 3, dec] x 6 (24). Stuff the head firmly with fiberfill at this point.
- Round 19: [sc 2, dec] x 6 (18)
- Round 20: [sc, dec] x 6 (12)
- Round 21: dec x 6 (6). Fasten off leaving a very long tail for sculpting.
Sculpting the Ribs: Thread the long tail onto your tapestry needle. Bring the needle through the center of the head from the bottom opening to the top center. Pull the yarn tight over the outside of the head to create a deep groove, then insert the needle back through the bottom. Repeat this 6 times around the head to create the segment sections of the pumpkin. Pull tight and secure the yarn.
2. The Stem and Leaves
Using Green yarn.
Stem: Ch 6. Row 1: Starting in 2nd ch from hook, sc in each ch across (5). Fasten off, leaving a tail for sewing. Sew to the top center of the head.
Collar Leaves (make 6): Ch 7. Starting in 2nd ch from hook, sl st, sc, hdc, dc, hdc, sc. Fasten off. Sew these leaf shapes together in a circle to form a collar that sits under the pumpkin head.
3. The Royal Body & Suit
We will start with Black yarn to create the suit trousers and jacket.
- Round 1: 6 sc in MR (6)
- Round 2: inc in each st around (12)
- Round 3: [sc, inc] x 6 (18)
- Round 4: [sc 2, inc] x 6 (24)
- Round 5: [sc 3, inc] x 6 (30)
- Round 6–10: sc in each st around (30)
- Round 11: BLO sc in each st around (30). This creates the ridge where the jacket hem will be added.
- Round 12–16: sc in each st around (30)
- Round 17: [sc 3, dec] x 6 (24)
- Round 18: sc in each st around (24)
- Round 19: [sc 2, dec] x 6 (18). Stuff the body firmly.
- Round 20: [sc, dec] x 6 (12)
- Round 21: sc in each st around (12). Fasten off, leaving a tail for sewing.
Jacket Hem (FLO of Round 11): Attach black yarn to the front loops of Round 11. Work: [ch 1, sc, hdc, dc, hdc, sc, sl st] around to create a stylized jacket skirt look. Fasten off and weave in the ends.
4. Legs and Arms (Make 2 of Each)
Legs: Start with black yarn. Round 1: 6 sc in MR. Round 2: inc x 6 (12). Round 3: BLO sc in each st (12). Round 4: [sc 2, dec] x 3 (9). Round 5–15: sc in each st (9). Stuff lightly. Fasten off.
Arms: Start with white yarn (for hands). Round 1: 5 sc in MR. Round 2: inc, sc 4 (6). Round 3: sc in each st (6). Change to black yarn. Round 4–12: sc in each st (6). Do not stuff. Fasten off.
Assembly and Royal Details
First, sew the white and black details onto the jacket. Use white yarn to embroider vertical pinstripes down the black body. Embroider a small white bowtie or bat tie under the collar area.
Position the green leaf collar over the top of the body, then sew the pumpkin head securely onto the body neck opening. Ensure the neck is stuffed firmly so the head does not wobble.
Sew the arms to the sides of the body, just below the neck. Sew the legs to the bottom of the body. If desired, you can add a tiny crown made of yellow felt or crocheted with yellow yarn [ch 10, join, and work small picots] and sew it to the top of the stem.
Expert Tips for Amigurumi
Keep your tension as consistent as possible. Since this design uses black yarn, it can be difficult to see the stitches. We highly recommend working in a well-lit room or using a light-colored stitch marker. When embroidering the pinstripes, pull the needle through the stitches rather than splitting the yarn threads to keep the stripes clean and straight.
Gifting & Display Suggestions
The finished pumpkin king amigurumi makes a wonderful Halloween centerpiece, desk accessory, or a collectible item for gothic fantasy fans. Display him alongside small crocheted cauldrons, ghosts, and bats. Store him in a dry place and dust him lightly with a soft brush to keep his stitches pristine for years to come.