Penguin Barista Crochet Keychain: Free Amigurumi Pattern
Crafting the Cutest Penguin Barista Crochet Keychain
Note: This pattern uses US crochet terminology. UK/Commonwealth terms: sc = dc, hdc = htr, dc = tr, tr = dtr.
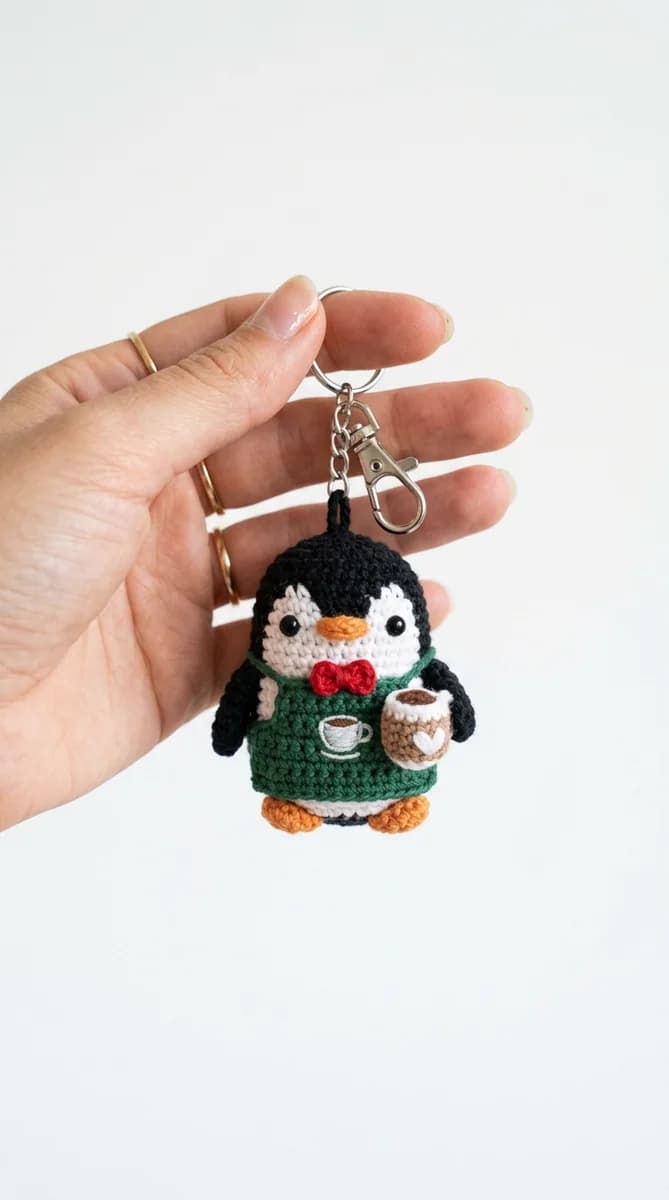
If you love coffee and crochet equally, this penguin barista crochet keychain is the perfect project for you! Picture a tiny adorable penguin wearing a little barista apron, holding a miniature coffee cup in its flippers — this is the kind of whimsical amigurumi design that makes people smile everywhere it goes. Whether you hang it on your keychain, your bag, your lanyard or give it as a gift to the coffee lover in your life, this handmade accessory is guaranteed to delight anyone who sees it.
This comprehensive crochet tutorial will walk you through all the steps needed to complete your penguin barista, from the head and body to the tiny accessories like the apron and the little coffee cup. The pattern uses beginner-friendly techniques and basic stitches, so even if you’re new to amigurumi, you’ll be able to follow along with ease. Let’s gather our materials and start crocheting!
Materials Needed
- Yarn: DK or Sport weight cotton yarn in black (body, head), white (belly, face), orange or yellow (beak and feet), brown (tiny coffee cup), and any color for the apron (classic green like a Starbucks apron, or a fun pastel).
- Crochet Hook: 2.5 mm or 2.75 mm for tight amigurumi stitches.
- Safety Eyes: 8 mm or 10 mm black safety eyes for the expressive penguin face.
- Stuffing: Polyester fiberfill to firmly stuff the body.
- Tapestry Needle: For sewing pieces together and weaving in ends.
- Keychain Ring: Sturdy metal ring with a small chain.
- Stitch Markers & Scissors.
Abbreviations
- ch: Chain
- sc: Single crochet
- hdc: Half double crochet
- inc: Increase (2 sc in one stitch)
- dec: Decrease (invisible decrease recommended)
- sl st: Slip stitch
- BLO: Back loop only
- MR: Magic ring
- st(s): Stitch(es)
- Rnd(s): Round(s)
Step-by-Step Crochet Pattern
Part 1: The Penguin Head & Body (worked in one piece, bottom to top)
Using black yarn:
- Rnd 1: MR, 6 sc. (6 sts)
- Rnd 2: [inc] × 6. (12 sts)
- Rnd 3: [1 sc, inc] × 6. (18 sts)
- Rnd 4: [2 sc, inc] × 6. (24 sts)
- Rnd 5-10: 1 sc in each st around. (24 sts)
Begin adding the white belly panel — surface embroider or crochet a flat oval in white yarn covering approximately 8 stitches wide across rounds 3-9. Alternatively, you can switch to white yarn at the belly position for a portion of each round.
- Rnd 11: [2 sc, dec] × 6. (18 sts)
- Rnd 12: [1 sc, dec] × 6. (12 sts)
Insert the safety eyes between Rounds 7 and 8, leaving about 5 stitches apart. Firmly stuff the body.
- Rnd 13: [dec] × 6. (6 sts)
Fasten off, close the hole and hide the yarn end. This is the lower body.
Part 2: The Penguin Head (separate piece)
Using black yarn:
- Rnd 1: MR, 6 sc. (6 sts)
- Rnd 2: [inc] × 6. (12 sts)
- Rnd 3: [1 sc, inc] × 6. (18 sts)
- Rnd 4: [2 sc, inc] × 6. (24 sts)
- Rnd 5-8: 1 sc in each st. (24 sts)
- Rnd 9: [2 sc, dec] × 6. (18 sts)
Add the white face panel (embroidered or surface crocheted). Insert safety eyes between rounds 6 and 7. Stuff firmly.
- Rnd 10: [1 sc, dec] × 6. (12 sts)
- Rnd 11: [dec] × 6. (6 sts)
Fasten off and close. Sew the head to the top of the body, slightly tilted forward.
Part 3: The Beak (orange yarn)
- Rnd 1: MR, 4 sc. (4 sts)
- Rnd 2: [inc] × 4. (8 sts)
- Rnd 3: 1 sc in each st. (8 sts)
Fasten off. Stuff lightly and sew to the center of the white face.
Part 4: The Wings/Flippers (make 2, black yarn)
- Rnd 1: MR, 4 sc. (4 sts)
- Rnd 2: [1 sc, inc] × 2. (6 sts)
- Rnd 3-5: 1 sc in each st. (6 sts)
Fasten off leaving a tail. Flatten and sew one flipper on each side of the body. For the barista look, the right flipper should be positioned to hold the coffee cup.
Part 5: The Tiny Coffee Cup (brown yarn)
- Rnd 1: MR, 4 sc. (4 sts)
- Rnd 2: [inc] × 4. (8 sts)
- Rnd 3-5: 1 sc in each st. (8 sts)
Fasten off and leave the top open. Add a small circle of white or cream yarn on top to represent the foam of a latte. Sew or glue the cup to the penguin’s right flipper.
Part 6: The Barista Apron (in your chosen color)
Make a small rectangular piece: ch 8, turn, work 6 rows of sc. Fasten off. Sew two thin straps (chains of 5) to the upper corners. Tie around the penguin’s neck to complete the apron look. You can embroider a tiny star or heart on the apron front for extra cuteness.
Assembly & Finishing Touches
After assembling all pieces, attach the keychain hardware to the very top of the head by looping sturdy thread through Round 1 multiple times and knotting securely. Make sure all sewn joins are tight and double-knotted. You can also add a tiny coffee bean or embroidered coffee cup logo on the apron for extra detail.
Customization Ideas
This penguin barista crochet keychain is wonderfully versatile. Swap the apron color to represent your favorite coffee shop. Give your penguin a tiny chef’s hat instead of just an apron. Change the yarn colors of the belly for a completely different look. You can even make a matching set — penguin, coffee cup, and a tiny coffee bean — for a complete coffee-themed keychain collection!
Care Instructions
Hand wash gently in cool water with mild soap. Press out excess water with a towel (do not wring). Reshape and lay flat to dry in the shade. Avoid machine washing to preserve the delicate embroidered details and the keychain hardware.