Pegasus Keychain Crochet: Free Pattern & Step-by-Step Tutorial
Why You’ll Love This Pegasus Keychain
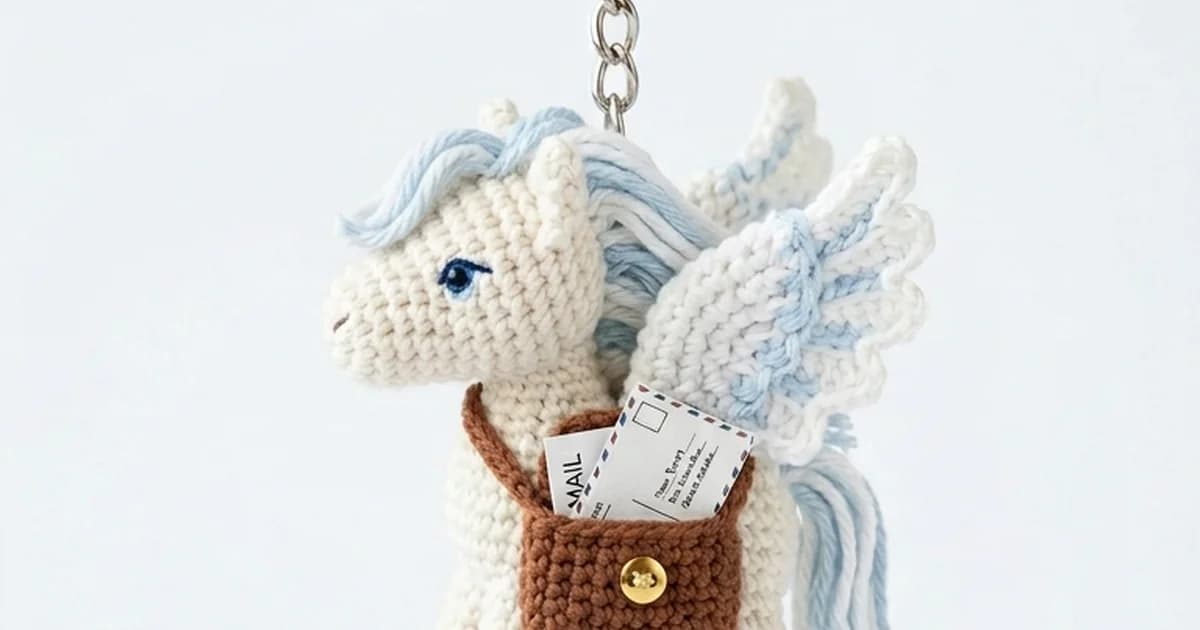
This pegasus keychain crochet is a delightful project that brings a touch of magic to your everyday life. Whether you want to decorate your backpack, your keys, or give a handmade gift to a friend, this little winged horse carrying a tiny mail envelope is absolutely perfect. The design is compact, cute, and surprisingly easy to make once you get the hang of the basic amigurumi stitches.
Materials Needed
- Yarn: Sport weight cotton yarn in white (body), light blue or pink (wings/mane), and a tiny bit of yellow (hooves/horn). Also white and red for the mail envelope.
- Crochet Hook: 2.5 mm (or size appropriate for your yarn)
- Safety Eyes: 6mm black safety eyes
- Stuffing: Polyester fiberfill
- Tapestry needle
- Stitch marker
- Keychain ring
- Scissors
Abbreviations (US Terms)
- mr = magic ring
- sc = single crochet
- inc = increase (2 sc in one stitch)
- dec = invisible decrease (sc 2 together)
- ch = chain
- st(s) = stitch(es)
- sl st = slip stitch
- hdc = half double crochet
- dc = double crochet
- FO = fasten off
Step-by-Step Pattern
Head and Body
The head and body are worked in one continuous piece, starting from the top of the head.
Rnd 1: 6 sc in mr (6)
Rnd 2: 6 inc (12)
Rnd 3: [1 sc, 1 inc] x 6 (18)
Rnd 4: [2 sc, 1 inc] x 6 (24)
Rnd 5: [3 sc, 1 inc] x 6 (30)
Rnd 6-10: 30 sc (30) (5 rounds)
Place safety eyes between rounds 8 and 9, about 6 stitches apart.
Rnd 11: [3 sc, 1 dec] x 6 (24)
Rnd 12: [2 sc, 1 dec] x 6 (18)
Start stuffing the head firmly. Keep stuffing as you go.
Rnd 13: [1 sc, 1 dec] x 6 (12)
Rnd 14: 12 sc (12) (Neck)
Rnd 15: [1 sc, 1 inc] x 6 (18)
Rnd 16: [2 sc, 1 inc] x 6 (24)
Rnd 17-21: 24 sc (24) (5 rounds)
Rnd 22: [2 sc, 1 dec] x 6 (18)
Rnd 23: [1 sc, 1 dec] x 6 (12)
Stuff the body firmly.
Rnd 24: 6 dec (6)
FO, leaving a tail. Thread the tail through the front loops of the remaining 6 stitches, pull tight to close the hole, and weave in the end.
Snout
Use white yarn.
Rnd 1: 6 sc in mr (6)
Rnd 2: 6 inc (12)
Rnd 3: 12 sc (12)
FO, leaving a long tail for sewing. Sew to the front of the head, between the eyes. Stuff lightly before closing.
Ears (Make 2)
Use white yarn.
Rnd 1: 4 sc in mr (4)
Rnd 2: [1 sc, 1 inc] x 2 (6)
Rnd 3: [2 sc, 1 inc] x 2 (8)
Rnd 4: 8 sc (8)
FO, leaving a tail. Flatten the ear, do not stuff. Sew to the top of the head.
Horn
Use yellow yarn.
Rnd 1: 4 sc in mr (4)
Rnd 2: 4 sc (4)
Rnd 3: [1 sc, 1 inc] x 2 (6)
Rnd 4: 6 sc (6)
FO, leaving a tail. Sew to the forehead between the ears.
Legs (Make 4)
Start with yellow yarn (hooves).
Rnd 1: 6 sc in mr (6)
Rnd 2: 6 sc (6)
Change to white yarn.
Rnd 3-5: 6 sc (6)
FO, leaving a long tail. Stuff lightly. Sew to the bottom of the body.
Wings (Make 2)
Use light blue or pink yarn.
Row 1: Ch 6, start in 2nd ch from hook: 5 sc, ch 1, turn (5)
Row 2: 3 sc, 1 dec, ch 1, turn (4)
Row 3: 4 sc, ch 1, turn (4)
Row 4: 2 sc, 1 dec, ch 1, turn (3)
Row 5: 3 sc.
FO, leaving a tail. Sew the wings to the back of the body.
Mane and Tail
Use light blue or pink yarn. Attach yarn to the top of the head behind the horn, ch 8, sl st back down the chain. Repeat this process down the back of the neck for the mane. For the tail, attach yarn to the lower back, make 3-4 strands of ch 10, sl st back down.
The Little Mail Envelope
Use white yarn.
Row 1: Ch 7, start in 2nd ch: 6 sc, ch 1, turn (6)
Row 2-4: 6 sc, ch 1, turn (6)
FO, weave in ends. Using red yarn, embroider a small heart or an ‘X’ in the center of the rectangle to make it look like a sealed envelope. You can also embroider diagonal lines to simulate the envelope flaps. Sew the envelope to the front of the pegasus body or between its front legs.
Assembly and Finishing Touches
Once all parts are securely sewn onto the main body, check for symmetry. The little mail envelope gives this amigurumi its unique character! Finally, attach the keychain ring securely to the top of the head, right behind the horn and the mane. Make sure it is anchored through several stitches so it won’t pull loose with daily use.
Conclusion
Congratulations, your magical messenger is complete! This adorable crochet project is sure to bring smiles. It’s a fantastic small gift for friends who love fantasy creatures or for postmen and delivery drivers as a cute token of appreciation. Don’t forget to experiment with different mane colors or make a whole flock of little pegasus messengers. Happy crocheting!