Peacock Amigurumi Crochet: Fashion Boutique Scene — Free Pattern & Tutorial
Peacock Amigurumi Crochet: The Fashion Boutique Scene
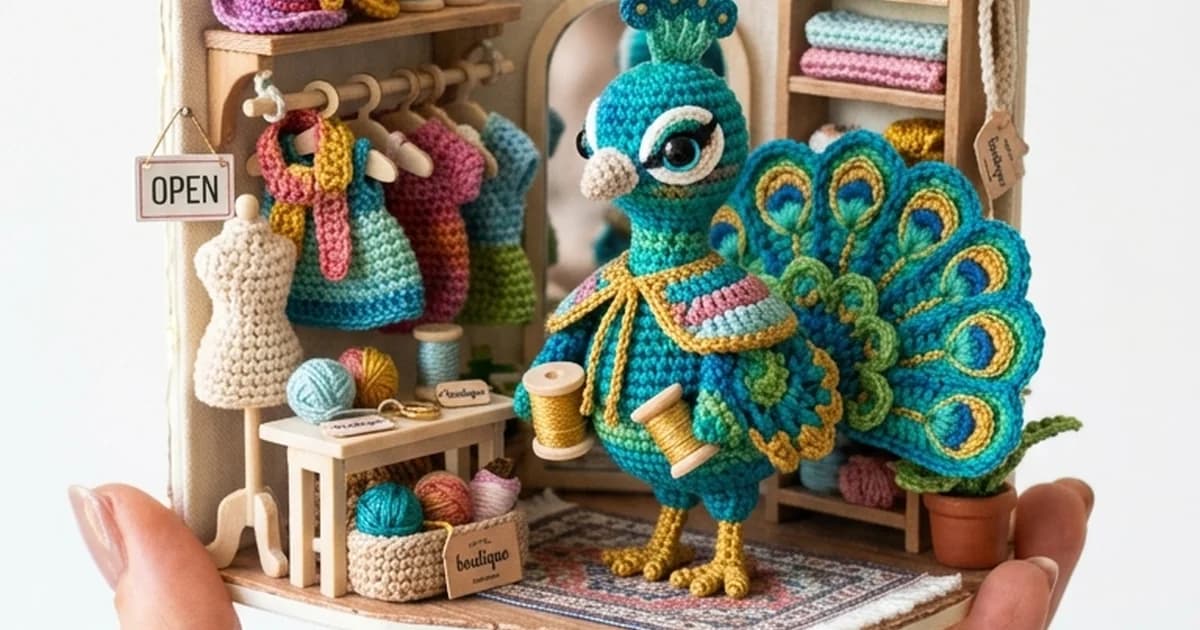
This peacock amigurumi crochet fashion boutique scene is one of the most intricate and charming projects you can create. Imagine a tiny hand-stitched boutique where a majestic teal peacock — with a fully fanned tail of green and gold — stands proudly inside a miniature shop filled with colorful crochet dresses, a wooden dress form, yarn spools, a shelf stocked with folded fabrics, and a glowing “OPEN” sign. This is not just a crochet project; it is a tiny work of art.
Materials You Will Need
- Yarn colors: Teal, turquoise, green, gold/mustard, beige, white, pink, lavender, cream, brown
- Hook sizes: 2.0 mm – 2.5 mm for the amigurumi figures; 1.5 mm for miniature accessories
- Safety eyes: 8 mm black safety eyes with white highlights (2 units)
- Fiberfill stuffing for the peacock body and tail
- Tapestry needle for assembly and embroidery
- Cardboard or foam board for the diorama base
- Wooden dowels or skewers for the clothing rack and shelf supports
- Mini LED string lights (optional, for the warm boutique glow effect)
- Fabric glue or hot glue for assembling the diorama structure
- Stitch markers, scissors, ruler
Abbreviations Used in This Pattern
- MR – Magic Ring
- sc – single crochet
- inc – increase (2 sc in same stitch)
- dec – invisible decrease
- sl st – slip stitch
- ch – chain
- BLO – back loop only
- FLO – front loop only
- hdc – half double crochet
- dc – double crochet
Part 1: The Peacock Body
Begin with teal yarn and a 2.5 mm hook. The peacock body is worked in continuous rounds.
Head: MR, Round 1: 6 sc (6). Round 2: inc × 6 (12). Round 3: [sc, inc] × 6 (18). Round 4: [sc 2, inc] × 6 (24). Rounds 5–9: sc around (24). Insert safety eyes between rounds 6 and 7, approximately 7 stitches apart. Round 10: [sc 2, dec] × 6 (18). Round 11: [sc, dec] × 6 (12). Stuff firmly. Round 12: dec × 6 (6). Fasten off and close.
Crest feathers (make 5): With teal and a small amount of turquoise, chain 8, sc in 2nd chain from hook, sc across. Leave tail for sewing. Attach in a fan shape on top of the head.
Beak: With gold yarn, sc 6 in MR, inc × 3, sc 3 (9). Flatten and sew to face between eyes.
Body: With teal yarn. MR, Round 1: 6 sc. Round 2: inc × 6 (12). Round 3: [sc, inc] × 6 (18). Round 4: [sc 2, inc] × 6 (24). Round 5: [sc 3, inc] × 6 (30). Rounds 6–14: sc around (30). Round 15: [sc 3, dec] × 6 (24). Round 16: [sc 2, dec] × 6 (18). Stuff. Round 17: [sc, dec] × 6 (12). Round 18: dec × 6 (6). Close.
Wings (make 2): Flat piece. With teal. Chain 10. Row 1: sc in each (9). Rows 2–5: sc across, decrease at each end every other row until tapered. Fasten off. Embroider gold accent lines.
Part 2: The Magnificent Tail Fan
The tail is the most spectacular part of this peacock amigurumi crochet scene. It is worked as a large semi-circle of layered feathers.
Tail base panel: With green yarn. Chain 40. Work 12 rows of sc, increasing at both ends every other row to create a fan shape. Change to teal for the outer 3 rows. Finish edges with a round of sl st.
Feather eye spots (make 8–10): With teal. MR, 6 sc (6). Round 2: inc × 6 (12). Round 3: sc around. Switch to gold for 1 round, then a final round of sc in dark green or navy. These are sewn onto the tail panel in a scattered pattern to mimic real peacock feathers.
Assembly: Sew the tail panel to the back of the peacock body so it fans outward and upward. The peacock should be able to stand independently when the tail acts as a support base.
Part 3: The Boutique Diorama
The boutique background makes this project truly unique. It transforms a simple amigurumi into a complete miniature scene.
Diorama base: Cut a circle of foam board approximately 20 cm in diameter. Cover with crochet fabric using sc in beige or cream yarn.
Back wall: Cut a rectangular piece of cardboard (approximately 20 × 15 cm). Wrap in cream-colored crochet fabric. Add a small printed sign reading “PEACOCK FASHION BOUTIQUE — Hand-Stitched — Est. 2023”.
Clothing rack: Use two wooden dowels as vertical supports, and one horizontal dowel as the rail. Wrap each with brown yarn. Hang 3–4 miniature crocheted dresses in bright colors (pink, yellow, teal, multicolor) using mini yarn loops as hangers.
Mini dresses (make 3–4): Each dress is worked flat. Chain 10. Row 1: sc across (9). Rows 2–3: dc across with inc at sides (forming the skirt flare). Rows 4–5: sc for bodice, decrease slightly. Add straps with 2 chain loops. Use vibrant colors for each dress.
Dress form/mannequin: Work a small body form in beige yarn. MR, 6 sc, inc round (12), two plain rounds, then shape the shoulders with a few decreases and increases. Mount on a toothpick or thin dowel as the stand.
Shelf and fabric bolts: Construct a small 2-tier shelf from cardboard wrapped in brown yarn. Place folded rectangles of crocheted fabric (in pink, teal, and pastel tones) to mimic fabric bolts.
Yarn spools: Make 4–6 small cylinders (6 sc rounds, 5–6 rounds tall) in different colors. The peacock can hold one spool in its wing.
Assembly of the Complete Scene
- Position the peacock at the center of the diorama base, slightly to the right, tail fanned behind.
- Attach the clothing rack to the left wall area.
- Place the dress form near the front left.
- Install the shelf on the right back wall with fabric bolts.
- Scatter yarn spools on a small work table made from a square of cardboard on two short dowels.
- Hang a small “OPEN” sign on the front-left edge of the diorama.
- Add mini LED lights along the top of the back wall for a warm boutique glow.
Expert Tips for a Professional Finish
Work with a hook at least one size smaller than the yarn label recommends to keep the amigurumi fabric tight and prevent stuffing from showing. Block the tail fan panel with water and pins before assembly so it holds its semi-circular shape when dry.
Use embroidery thread (not yarn) for the finest details like the feather vein lines and the boutique sign text to achieve crisp, readable lettering at miniature scale.
Gifting and Display Ideas
This peacock amigurumi crochet fashion boutique scene makes a spectacular gift for fashion lovers, craft enthusiasts, or collectors of miniature art. Display it under a glass cloche to protect it from dust while showcasing all of its delicate details. It also photographs beautifully for social media, craft fairs, and handmade product listings on Etsy.
Conclusion
Creating this peacock amigurumi crochet fashion boutique diorama is a rewarding journey that combines classic amigurumi techniques with miniature scene-building. Save this tutorial, share it with your crochet community, and tag us when your boutique opens for business!