Crochet Pegasus Amigurumi: Free Pattern & Step-by-Step Tutorial
Why You’ll Love This Magical Pegasus Crochet Project
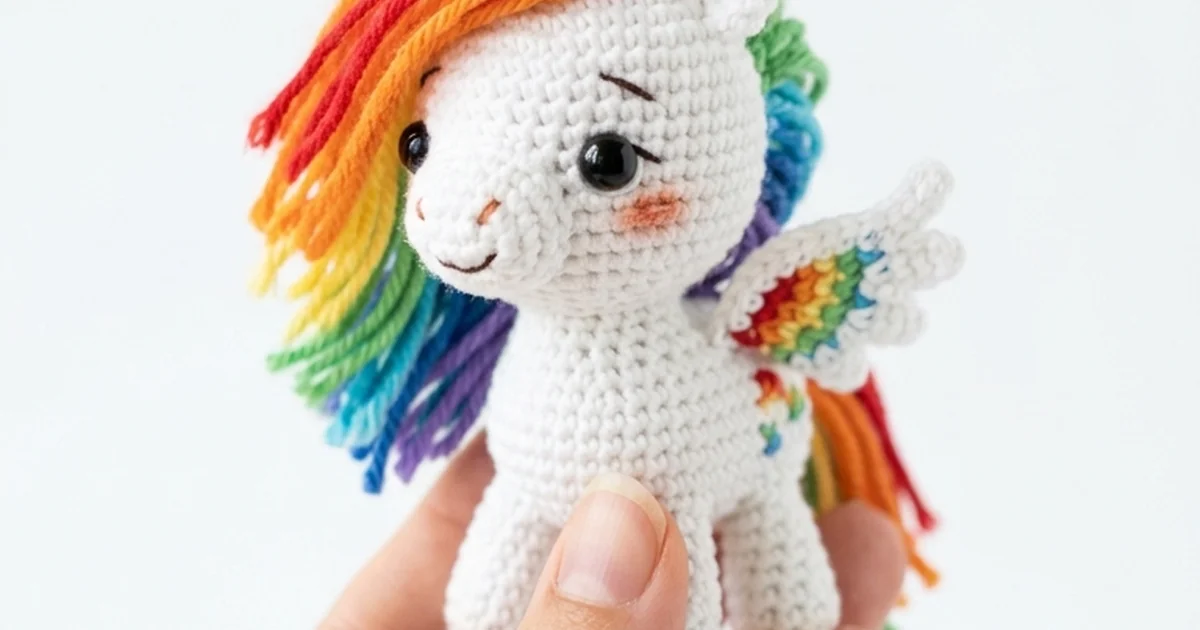
Creating a beautiful pegasus crochet amigurumi is one of the most rewarding projects for crafters who adore fantasy creatures. This pattern combines classic amigurumi shaping with delicate wing construction to bring the legendary winged horse to life in a palm-sized design. Whether you are crafting a toy for a child, a cute decor piece, or a special gift for a friend, this step-by-step guide provides everything you need to succeed. The soft texture, elegant wings, and custom colors make this project stand out in any collection.
Necessary Materials & Yarn Selection
Before you begin, gather all the essential supplies to ensure a smooth crafting process. Using the right materials makes a significant difference in the final look and durability of your amigurumi.
- Main Body Yarn: White or pastel lilac (semi-cotton yarn is highly recommended for clean stitch definition).
- Mane and Tail Yarn: Soft pink, sky blue, and yellow for a beautiful rainbow effect.
- Wing Yarn: Bright white or cream.
- Hook Size: 2.0 mm or 2.25 mm (always use a hook slightly smaller than recommended on the yarn label to keep stitches tight).
- Safety Eyes: 6 mm or 8 mm black safety eyes (2 pieces).
- Stuffing: Premium polyester fiberfill.
- Tools: Tapestry needle, stitch markers, and sharp scissors.
- Optional wire: Small piece of craft wire to make the wings posable.
Amigurumi Abbreviations
We use standard US crochet terminology for this pattern. Review these common abbreviations before starting:
- MR – Magic Ring
- ch – Chain
- sc – Single Crochet
- inc – Increase (2 single crochets in one stitch)
- dec – Decrease (invisible decrease recommended)
- hdc – Half Double Crochet
- dc – Double Crochet
- sl st – Slip Stitch
- BLO – Back Loop Only
- FLO – Front Loop Only
Step-by-Step Pattern: The Pegasus Head
Start by crocheting the head with your main body color yarn. Work in continuous rounds.
Round 1: Start 6 sc in a Magic Ring (6 sts).
Round 2: inc in each st around (12 sts).
Round 3: [sc, inc] × 6 (18 sts).
Round 4: [sc 2, inc] × 6 (24 sts).
Round 5: [sc 3, inc] × 6 (30 sts).
Round 6: [sc 4, inc] × 6 (36 sts).
Rounds 7–12: sc in each st around (36 sts).
Insert safety eyes between rounds 9 and 10, leaving about 7 stitches between them. If you prefer embroidered eyes, you can sew them on later.
Round 13: [sc 4, dec] × 6 (30 sts).
Round 14: [sc 3, dec] × 6 (24 sts).
Round 15: [sc 2, dec] × 6 (18 sts).
Stuff the head firmly with fiberfill, ensuring a smooth round shape without stretching the stitches.
Round 16: [sc, dec] × 6 (12 sts).
Round 17: dec × 6 (6 sts).
Fasten off, weave in the yarn end, and leave a tail for sewing to the body.
Step-by-Step Pattern: The Pegasus Body
Using the main body color yarn, we will crochet the body from the bottom up.
Round 1: Start 6 sc in MR (6 sts).
Round 2: inc in each st around (12 sts).
Round 3: [sc, inc] × 6 (18 sts).
Round 4: [sc 2, inc] × 6 (24 sts).
Round 5: [sc 3, inc] × 6 (30 sts).
Round 6: [sc 4, inc] × 6 (36 sts).
Rounds 7–13: sc in each st around (36 sts).
Round 14: [sc 4, dec] × 6 (30 sts).
Round 15: sc in each st around (30 sts).
Round 16: [sc 3, dec] × 6 (24 sts).
Round 17: sc in each st around (24 sts).
Round 18: [sc 2, dec] × 6 (18 sts).
Stuff the body firmly with fiberfill.
Round 19: sc in each st around (18 sts).
Round 20: [sc, dec] × 6 (12 sts).
Fasten off and leave a long tail for assembly.
Pattern: The Wings (Make 2)
Use bright white yarn for the wings to make them look majestic. These are worked in flat rows to create a feather texture.
Row 1: ch 11. Starting in the second ch from hook, sc in next 10 ch. Turn.
Row 2: ch 1, sc in next 8 sc (leave 2 stitches unworked to create a step effect). Turn.
Row 3: ch 1, BLO sc in next 8 sc. Turn.
Row 4: ch 1, sc in next 6 sc. Turn.
Row 5: ch 1, BLO sc in next 6 sc. Turn.
Row 6: ch 1, sc in next 4 sc. Turn.
Row 7: ch 1, BLO sc in next 4 sc. Turn.
Fasten off and leave a long thread for sewing. Repeat to make the second wing, turning the rows in the opposite direction to make a left and right wing.
Pattern: Legs (Make 4)
Use main body color and optionally change to gold/yellow yarn for the hooves.
Round 1: Start 6 sc in MR (6 sts).
Round 2: inc in each st around (12 sts).
Round 3: BLO sc in each st around (12 sts). (This creates the flat base of the hoof).
Round 4: Change to main body color, sc in each st around (12 sts).
Round 5: [sc 4, dec] × 2 (10 sts).
Rounds 6–9: sc in each st around (10 sts).
Stuff the lower half of the legs lightly. Fasten off and leave a tail for sewing.
Mane & Tail Construction
To make the mane, make chains of different lengths in your accent colors (pink, blue, yellow) and attach them directly to the head. For example, ch 20, starting from the second ch from hook, 2 hdc in each chain to create a beautiful curly lock. Make 4 to 5 curls for the mane and 3 curls for the tail. Sew the mane along the center line of the head from the top down to the neck, and the tail to the back of the body.
Assembly & Embroidery Details
Assembly is the most important step to give your pegasus its unique personality. Take your time to align all parts before sewing.
- Pin the head to the body first. Use a tapestry needle to sew them together using the remaining stitches. Add extra stuffing to the neck if needed to prevent a floppy head.
- Align the legs on the bottom of the body. Make sure they are symmetric so the pegasus can stand or sit properly. Sew them securely.
- Attach the wings to the middle of the back, slightly angled outwards. If you used wire, run it through the body before attaching the wings.
- Sew the mane locks starting from between the ears down the back of the head.
- Add the tail to the lower back.
- Embroider small nostrils with a tiny amount of pink or grey yarn. You can also add cute rosy cheeks using pink blush or acrylic paint.
Pro Tips for Beautiful Results
For the best result with your pegasus crochet project, keep your stitches tight. If you notice gaps where the stuffing is visible, switch to a smaller hook size. When sewing parts together, always insert your needle under both loops of the stitch on the body and then through the stitch on the piece you are attaching. This makes the seams look seamless and professional. Enjoy the process of creating this magical winged creature!